


Azure Databases: MySQL Databases Migration
This document details the steps by step process on to migrate data between two MySQL databases. In this example, I will be performance the migration using an ubuntu cli, however, note that other CLIs can be used if you are allowed to SSH.
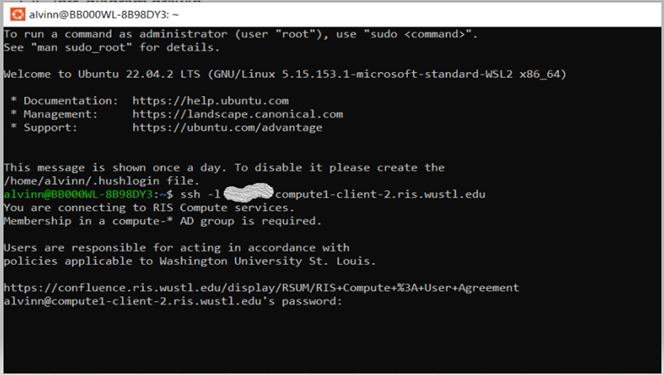
Step 1: Access RIS Server
- Open a CLI & SSH into compute1 using your washU credentials, run the following script and replace “username” with an appropriate washu ID.
Login Steps
  1. ssh -l username compute1-client-2.ris.wustl.edu
  2. Next, you will be prompted to enter your password
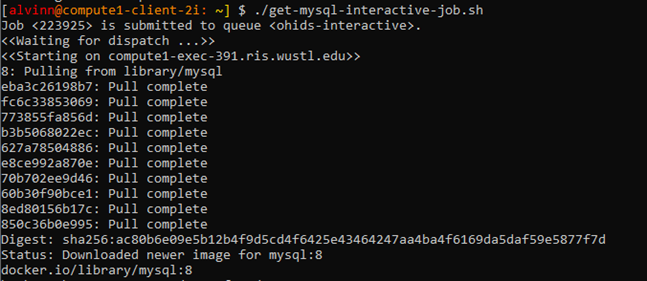
Step 2: Run MySQL Interative-Job
-
Ensure there is a MySQL-Interactive-Job that points to the right MySQL docker image or if it does not exist, you can create an .sh file by running the following steps:
  1. vi get-mysql-interactive-job.sh

  2. Copy the script below & paste it in the .sh file.

  LSF_DOCKER_ENV_FILE=MY_DOCKER.ENV \
  LSF_DOCKER_VOLUMES="/HOME/$USER:/HOME/$USER /STORAGE1/FS1/I2/ACTIVE:/STORAGE1/FS1/I2/ACTIVE" \
  BSUB \
  -IS \
  -M 2GB \
  -R 'RUSAGE[MEM=2GB] SELECT[MEM>2GB && GPUHOST] SPAN[HOSTS=1]' \
  -G COMPUTE-OHIDS \
  -Q OHIDS-INTERACTIVE \
  -A 'DOCKER(MYSQL:8)' \
  /BIN/BASH -L
Step 3: Create password file
- Create a file that stores the environment variable for the MySQl password.
- vi m_file.env file
- copy the following script & paste it.
MYSQL_ROOT_PASSWORD=ENTERANDOMPASSWORD - This is required by docker instance to connect to the database
Step 4: Execute the get-mysql-interactive-job.sh
-
Run the script below to run the job
./get-mysql-interactive-job.sh
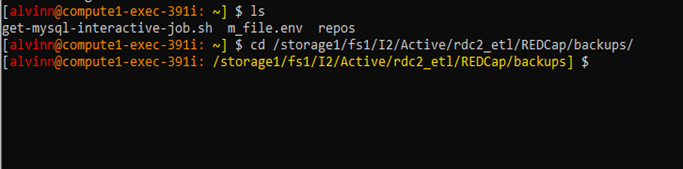
Step 5: Access backup directory
-
The Backup files will be stored in the storage1 backup directory
-
To access the directory, use the following cd command to gain access into the storage1 Redcap backup directory.
cd /storage1/fs1/I2/Active/rdc2_etl/REDCap/backups/
Step 6: Log into source & target database
-
Ensure you can log into the Source & Target Database by using the following script:
mysql -u admin-user-p -h 10.25.xx.xxx -
Next, replace the admin-user with the appropriate Database User & 10.25.xx.xxx with the appropriate hostname or database IP address.

Step 7: Backup Source
-
Run the script within the /storage1 directory same as that of step 5.
MYSQLDUMP -U ADMIN-USER -P --DATABASES <SOURCE DATABSE > > <SOURCEDATABASE>_20240924.SQL -
The script above takes the database backup without creating logs.
-
The script below takes a backup and logs the backup's progression.
TIME MYSQLDUMP -U ADMIN-USER -P --DATABASES TEST_DATABASE > TEST_DATABASE_20240924.SQL > TEST_DATABASE_20240924.LOG 2>&1s
Additional Information:
Performing a backup and restore, requires constant network availability and may take a lot of CPU or memory. Additionally, if there are disruptions, it may corrupt the backup or restore process. It is always advisable to run process in a remote server using tools such as ubuntu or any other CLI. Additionally, avoid using tools such as DBeaver as it constantly times out. Even when running the process in a remote server, you may still experience disruptions. To avoid disruptions, use the following steps:
Step 8: Use tmux to avoid disruptions
-
If your remote server does not have tmux, use the script attached to install it. Ensure it is time sensitive.
SUDO APT-GET INSTALL TMUX
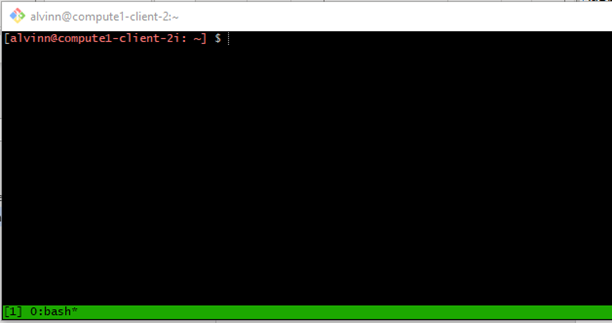
Step 9: Verify tmux is installed
- Ensure that tmux is installed at the regular ssh shell session.
- After installation, run the “tmux” command to verify it is up and running.
- After running tmux, you will get a screen with a green lower end.
- Use the cheat sheet to find various tmux commands link
Step 10: Extra Database monitoring
- In addition to generating logs in the remote server, you can also use Dbeaver Database session manager to view the backup/restore progression.
- In DbBeaver -> right click on database -> select Tools -> In Tools, select Session manager.
- When you open Session manager, a pop screen will open looking like this
